Free cookie consent management tool by TermsFeed Policy Generator

/dev/blog/ID10T

Advertisement

OpenSSL scribblings

SSL, Linux Comments

Just a quick writeup from my notes so I know where to look it up if I ever search for it again. In my examples I use Comodo as the certificate authority and ssl.example.org as domain.

Certificate chain verification

There are two scenarios I normally encounter, either verify if the certificate chain is complete or find out where the certificate chain breaks.

Verifying the whole chain

  1. Concatenate the certificate chain including the root certificate in one file. From the top of my head I’m not quite certain if order is important, leaf to root worked for me.
  2. Do an openssl verify with -CApath /dev/null to prevent taking the systems trust stores into account:
openssl verify -verbose -CApath /dev/null -CAfile concatenated-chain-file.pem ssl.example.org.crt

If the output of the command contains ‘OK’, the chain is complete.

Xiaomi Mi Band: Re-enable Early Bird Alarm

Android Comments

I bought a Xiaomi Mi Band 1S one year ago solely for the reason of taking advantage of the “Early Bird Alarm”. This feature essentially tells the band to watch your sleep cycles 30 minutes before your set alarm and wake you up if it detects you are in a light sleep some time during this timespan (you probably knew this already, why are you here otherwise? ;-}). Sadly, Xiaomi removed this feature some time in 2016 without ever mentioning why or if it ever returns. As I don’t use my band for everything else, I recently decided to recover my “Early Bird”. I was successful and want to share all the actions I tried in case others have a similar need for returning their smart alarm. I assume these steps can be applied to other Mi Band versions (Mi Band 1, Mi Band 1S, Mi Band 2) as well.

Prelude: I’m not certain if every action is needed. I tried dry testing my changes but all changes failed the tests, including the (fully working) one I’m using now. So I advise on “live” testing every change for two or three nights if you don’t want to pull completely through with everything. If you find out only parts of it are needed, I’d appreciate if you left a comment afterwards.

Kubernetes Single Node installation on CoreOS Container Linux

Docker, Linux, Coreos Comments

I’ve been playing with Kubernetes on CoreOS Container Linux for a couple of months now. As I prefer to implement real world workloads instead of examples, I planned on containerising a couple of applications my family and I rely on. Beforehand I wanted to create an easy way for installing a Kubernetes cluster spread across multiple VPS providers, securely connected over the internet via VPN or something similar. I did a speed test for initial evaluation of different methods and began working on a proof of concept CoreOS Kubernetes cluster secured via tinc. This prove more difficult than initially planned, taking me months for a simple setup and setting me back multiple times.

Therefore I settled with a Kubernetes installation residing on a single node. The clustering was a bit overkill for family applications anyways and this step just took to much time. For the Single Node installation I found a blog entry from Victor Palau who also created a GitHub repository for an automated Kubernetes installation to an existing Container Linux server. I tested his script on my server from Chicago VPS and although it largely worked, I was dissatisfied. As the script was initially intended to be run on Microsofts Azure, the requirements a bare metal installation has were not taken into account:
A couple of ports meant for internal use only were publicy accessible, insecure etcd2 being the worst one. Furthermore I didn’t like the apiserver listening on port 443. While on Azure you’d normaly prepend a Load balancer in front of the Single node, this doesn’t apply to a Bare Metal installation. Thusly HTTPS was effectively blocked on the node and there was no easy way for integrating a containerised load balancer like Træfɪk. Addtionally there were some smaller problems or additions I had in mind and wanted to integrate into the automation to ease installations for others and a possible reinstallation for myself.

Container Linux: Get a TTY without password

Coreos Comments

I’ve been experimenting a lot with CoreOS Container Linux (formerly simply CoreOS). One of the issues I’ve had regularly was getting my cloud-config to the server after an initial install. There’s no meta data drive or something similar on bare metal servers or normal VPS.

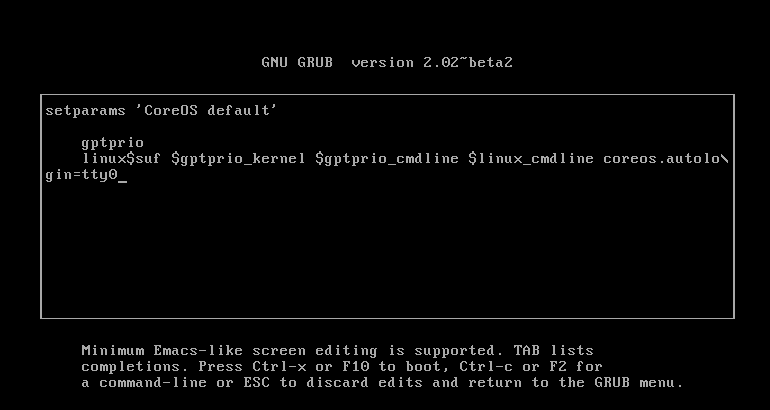
Easy solution: Bypass the authentication. If you have access to a VNC or something similar, you can add coreos.autologin=tty0 (or just omit the =tty0) kernel option to get to a login shell directly. If you don’t know where to put that, it needs to be put in the Grub command line. Here’s an image of it.

Container Linux Grub

So you need to press e in the Grub menu, enter the option behind the original options (in my case I put it behind $linux_cmdline) and press Ctrl+x or F10 afterwards to boot with it.

That’s it, your window will now put you into a login shell of the coreos user and you’ll be able to curl cloud-config.

Simplifying cloud-config creation for clusters

Coreos, Cloud Comments

I’m still experimenting with container orchestration. Currently I’m in the process of building a three node CoreOS cluster with Kubernetes on top of it, connected over the Internet. One problem I was constantly struggling with was keeping my cloud-configs in sync. Most of the configuration settings were identical or nearly identical on all three nodes. Still, when adding a small change, I needed to apply this change to all three files. Forgetting one or mistyping led to errors and unnecessary debugging sessions.

This weekend I decided I’ve had enough of it. I created a small Python script to simplify working on several nearly identical configuration files, cloud-config-creator. By iterating over a set of node values and one master template the script creates the cloud-configs for all nodes. It’s little more than a wrapper for the Jinja2 templating engine, but I still find this incredibly useful. That’s why I want to add a bit more explanation around it.

Prerequisites

You will need Python. I used Python 3, never tested it with 2.x. Furthermore you need to install the pyyaml and jinja2 modules. Before starting to use cloud-config-creator you should have basic knowledge of how to use templates. If you ever worked with a templating engine (e.g. for consul-template or Jekyll), you’ll quickly feel at home. Otherwise I recommend the Jinja2 documentation.
Furthermore you should know how to format YAML. My script uses PyYAML, which isn’t YAML 1.2 compatible (yet), so you’ll need to use YAML 1.1.

Script usage

./cloud-config --templatefile master.tmpl --valuesfile values.yml --outpath out/ --includepath includes/

Advertisement